A DIY golf simulator enclosure costs roughly 300 to 900 dollars in materials and a weekend of work, versus 1,500 to 4,000 dollars for a comparable commercial kit. The build breaks into four parts: a frame (most people use 3/4-inch EMT conduit or 2×4 lumber), a commercial impact screen, blackout side panels, and a safe bounce-back margin behind the hitting zone.
I framed my own enclosure after pricing the kits, and the honest verdict is that the frame is the easy part. The screen, the projector alignment, and the bounce-back geometry are where builds go wrong. This guide is the order I’d build in if I started again today, written from the enclosure I actually live with in my sim room, not a brochure. I’d already fought a projector into a sim-racing rig before I ever hung an impact screen, so the golf enclosure just added ball flight to physics I already knew.
What Does a DIY Golf Simulator Enclosure Actually Need?
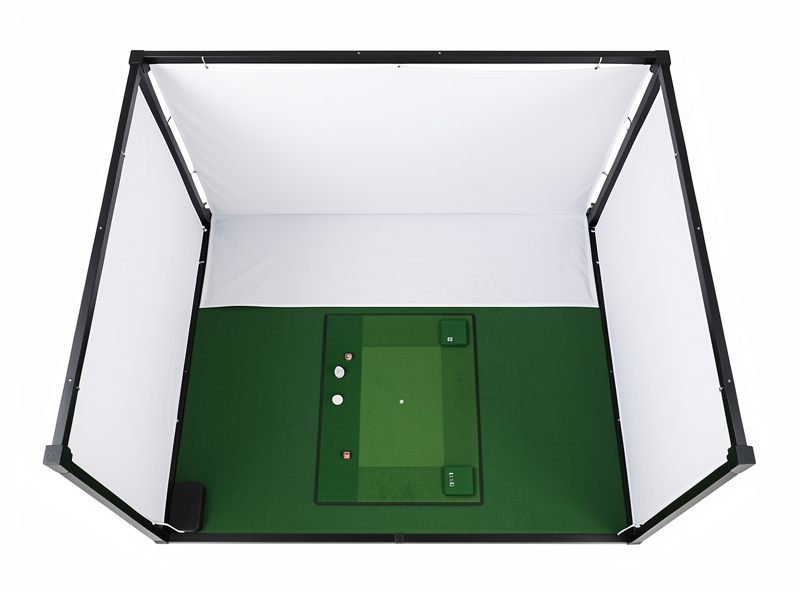
A working DIY golf simulator enclosure needs four things: a rigid frame, an impact screen tensioned flat, blackout side fabric to kill projector wash, and a deliberate gap behind the screen for bounce-back. Skip any one and the build fights you. The frame holds geometry, the screen takes the hit, the blackout makes the image readable, and the gap keeps balls off your walls.
The order matters more than the budget. Most first builds spend on the screen and improvise everything else, then discover the projector throws onto a wrinkled surface and balls rattle the studs behind. Plan the bounce-back gap first because it sets the room depth the rest of the build has to fit inside. If you have not measured your space yet, start with the golf simulator room requirements guide and the room depth math before you cut a single piece of conduit. The whole project lives or dies on whether the room can hold the swing and the standoff at the same time.
What Tools and Materials Does the Build Take?
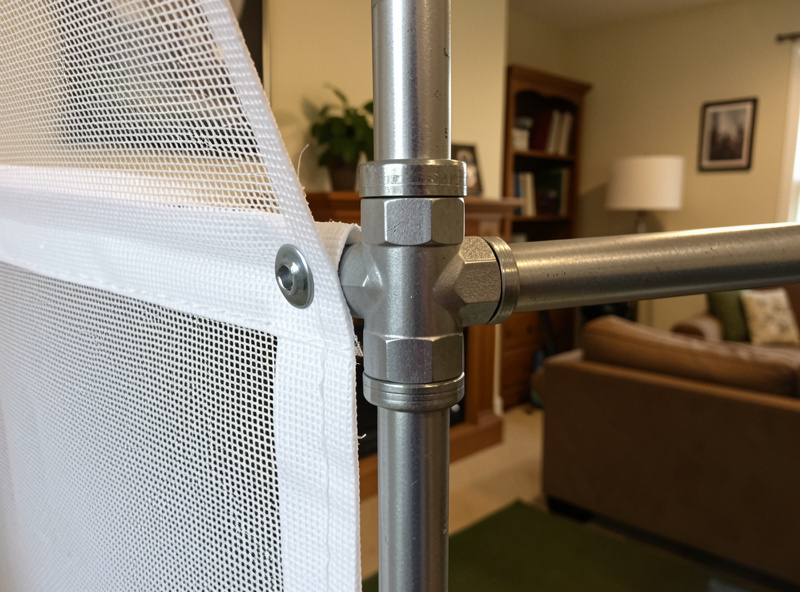
The full materials list is short: frame stock (about 60 feet of 3/4-inch EMT conduit or eight 2x4s for a typical enclosure), corner and tee fittings, a commercial impact screen sized to your frame, blackout fabric for the sides, and screen-tensioning hardware like grommets and bungee cord. Tools come down to a pipe cutter or hacksaw, a tape measure, a level, and a drill.
I keep the parts count deliberately low because every extra connector is another place the frame can rack out of square. On my build I cut conduit with a 15-dollar pipe cutter rather than a saw because the cutter leaves a clean square end that seats fully into the fitting — a ragged saw cut is what makes a conduit frame wobble. For the screen, buy the panel and the tensioning hardware together so the grommet spacing matches; mismatched spacing is the reason a lot of home screens hang with diagonal wrinkles. Budget a couple of dollars per linear foot for blackout fabric and do not substitute thin curtain liner, which lets light bleed through and greys the projected image.
DIY Enclosure Frame vs Commercial Kit: Which Is Worth It?
A DIY EMT-conduit frame runs about 80 to 150 dollars in pipe and fittings; a 2×4 frame is cheaper still at 40 to 70 dollars. A commercial enclosure kit with frame, screen, and side panels starts near 1,500 dollars and climbs past 4,000 for premium floor-to-ceiling units. The kit buys you fit and finish; the DIY route buys you a frame sized to your exact ceiling.
I went DIY because no off-the-shelf kit matched my ceiling height, and a fixed-size kit in a too-short room is wasted money. The trade-off is honest: a kit arrives square and tensioned, while a conduit build asks you to get the corners true and the screen flat yourself. If you have a tape measure, a hacksaw or pipe cutter, and a free Saturday, the conduit frame is the better value. If you want it perfect out of the box and have the depth for a standard kit, buy the kit. The detailed build, including the exact fittings that make a conduit frame rigid instead of rubbery, is in the EMT conduit frame guide.
| Component | DIY material cost | Commercial equivalent | What the money buys |
|---|---|---|---|
| Frame | $40-150 (2×4 or EMT) | $400-1,200 | Square corners, finished look, no cutting |
| Impact screen | $120-350 (panel) | $300-700 (with grommets/tensioning) | Edge reinforcement and even tension hardware |
| Side/blackout panels | $30-90 (blackout fabric) | $200-500 | Matched fabric, ball-containment netting |
| Bounce-back margin | $0 (depth) to $60 (foam) | Built into kit depth spec | Designed standoff distance |
| Total | $190-650 | $1,500-4,000+ | Turnkey assembly vs custom fit |
How Do You Choose an Impact Screen for a DIY Build?
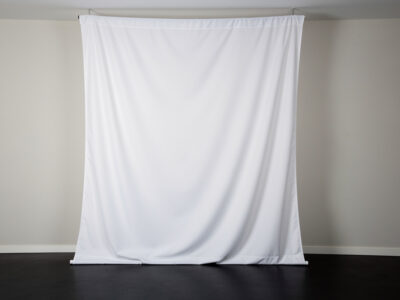
Pick a screen by material weave and ball-speed rating, not by brightness alone. A multi-layer woven polyester impact panel handles repeated driver strikes and shows a sharp image; a single-layer net-backed screen is cheaper but wears faster and shows more weave texture in the picture. For a home build, a mid-weight commercial panel rated for amateur swing speeds is the sweet spot.
On my enclosure I run a commercial multi-layer panel because the cheaper single-layer I tried first showed visible weave and developed a soft spot in the center within a winter of use. The screen is the one component I would not improvise. A bedsheet or tarp will tear, and worse, a torn surface throws a ruined image and turns a mishit into a projectile. Full material breakdown, including how to read weave specs without trusting marketing copy, is in the impact screen material guide.
Sizing matters as much as material. Measure your frame opening and order the panel a few inches larger on every side so you have edge material to grommet and tension; ordering exactly to the opening leaves nothing to grab and the screen sags. I size mine so the projected 16:9 image sits comfortably inside the panel with a dark margin all around — projecting right to the screen edge exaggerates any frame skew. The other quiet cost is the projector image fit: a screen too wide for your throw distance forces the projector back into the swing path, which is exactly why the screen and the projector get planned together rather than bought separately.
Why Is Bounce-Back the Most Dangerous Part of the Build?
Bounce-back is where a struck ball returns toward the hitter at speed, and it is the single biggest safety issue in a home enclosure. A screen hung too tight or with too little standoff behind it can fling a mishit straight back. The fix is a small amount of screen slack plus a deliberate air gap of several inches between the screen and any hard wall behind it.
I learned this the hard way: my first hang was drum-tight against a stud wall and a thinned shot came back past my ear before I had even checked my divot. A properly slack screen absorbs energy instead of trampolining it. Never mount a screen flat against drywall or concrete. The geometry, the standoff distance, and the side-netting that catches shanks before they reach a wall are covered in the bounce-back safety guide — read it before your first swing, not after.
Bounce-back also drives where you stand. A ball that does come back loses most of its energy to a slack screen, but you still want to be hitting from a position where any return rolls harmlessly rather than rebounds at you, and where bystanders are never in line behind the mat. In my room the mat sits far enough back that a returning ball is spent before it reaches me, and I treat the area directly behind the hitting position as off-limits during a session. None of this needs guesswork or invented numbers — it is a slack screen, an air gap you can measure with a tape, side netting, and standing in the right place. The safety guide walks the exact layout.
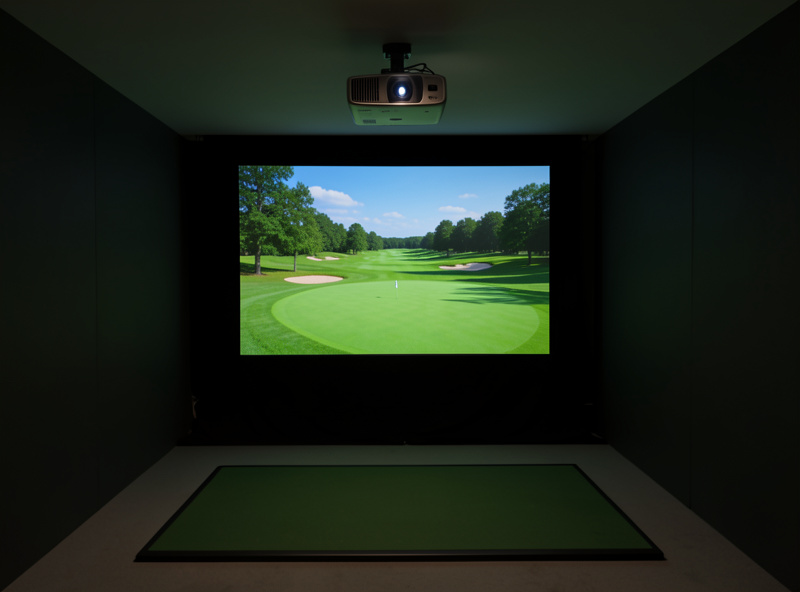
Projector or TV for a Golf Sim Enclosure?
A short-throw projector onto an impact screen is the standard answer because the screen has to take ball strikes and a TV cannot. A TV only makes sense in a net-only setup where the display sits safely off to the side and the ball never reaches it. Inside a full enclosure, the projection surface and the impact surface are the same panel, which rules a TV out.
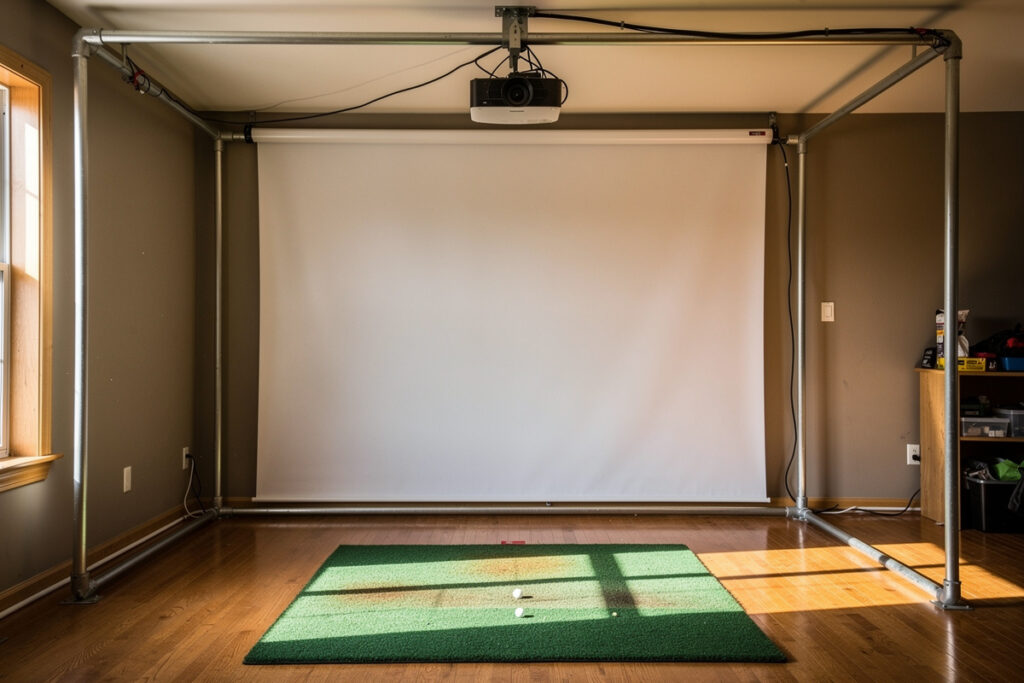
I aligned a short-throw projector into my enclosure precisely because it lets the image live on the surface taking the hit. The keystone and mounting fight is real — I keystoned mine three times before the rectangle sat true — but it is the only layout that works for a screen-based build. The full decision tree, including the rare net-only case where a TV actually wins, is in the projector vs TV guide, and projector throw distance ties directly into the screen distance math.
Where the projector mounts is the part people underestimate. Floor-mounted units sit in the ball path and get pelted; the standard fix is a ceiling mount ahead of the hitting position, which means your ceiling height has to clear both the mount and your driver swing. A short-throw lens earns its premium here because it fills the screen from a mount that sits forward of where you swing, instead of behind you where your head and club block the beam. On my build the projector hangs ahead of the mat and slightly off-center, then I correct the geometry in the lens and software rather than over-relying on digital keystone, which softens the image. The interaction between mount height, throw, and swing clearance is exactly why this decision cannot be made in isolation from room dimensions.
How Do You Black Out and Light the Enclosure?
Black out the inside of the enclosure with matte dark fabric so the projector image stays high-contrast, then add dim, indirect room light outside the projection cone so you can see the ball and your stance. Bright overhead light washes the screen; total darkness hides the ball. The enclosure interior wants to be dark; the hitting area wants soft ambient light.
In my room I lined the enclosure sides with matte blackout cloth and put a single dimmable lamp behind the hitting position, aimed away from the screen. The contrast jump was bigger than any projector upgrade I could have bought for the money. This is enclosure-scoped lighting — getting a readable image and a visible ball, not a whole-room AV design. The specific fabric choices and where the lamp goes are in the enclosure blackout and lighting guide.
The mistake I see most is treating the enclosure interior and the hitting area as one lighting problem. They are opposites. Inside the projection cone you want darkness and matte, light-absorbing surfaces so the image holds its blacks; outside it you want enough soft, indirect light to see the ball address and your alignment sticks. A glossy black surface still reflects the projector and washes contrast, which is why matte fabric beats black-painted plywood. Keep every light source out of the projector’s cone and off the screen face. Get this right and a modest projector looks far better than a bright one fighting a washed-out room — the cheapest image upgrade in the whole build is a roll of matte cloth and a lamp pointed the right way.
How Do You Keep the Screen and Enclosure Lasting?
Impact screens collect ball marks and grime that dull the image, and they wash with cool water and a soft brush, never with solvents or a washing machine. A screen cleaned a few times a season holds its brightness and weave far longer than one left to cake with mat dust and golf-ball scuff. Maintenance is the cheapest performance upgrade in the build.
I wash mine when the white starts to grey, which over a Swedish winter of daily practice is roughly monthly. Harsh cleaners break down the coating that keeps the weave projecting cleanly, and a machine wash will stretch the panel out of square for good. The full routine — what to use, what destroys a screen, and how to dry it without distorting the weave — is in the screen wash and care guide.
The dirt is not just cosmetic. Ball scuff and mat dust build a grey film that lowers contrast exactly the way bad lighting does, so a neglected screen quietly undoes the work you put into blacking out the room. Keeping a clean ball in play helps more than any cleaning trick — most of the marks come from grass-stained or scuffed outdoor balls, so I keep a dedicated set of clean indoor balls for the sim. Frame and fabric need almost nothing beyond an occasional check that the tension hardware has not loosened and the blackout cloth has not sagged into the projection cone. The screen is the only part that rewards a regular routine, and a few minutes a month is the difference between a panel that lasts several seasons and one that looks tired by spring.
What Are the Most Common DIY Enclosure Mistakes?
The five mistakes that wreck home enclosures are: buying the screen before measuring room depth, hanging the screen drum-tight, mounting it flat against a hard wall, lighting the room too brightly, and racking the frame out of square. Each one is cheap to avoid in planning and expensive to fix after the build is up. Four of the five I made myself on the first attempt.
The screen-first mistake is the costliest because a panel sized to a room that turns out too shallow either has no bounce-back gap or no swing clearance, and you cannot shrink a screen. The drum-tight mistake is the most dangerous because it turns the screen into a trampoline. Out-of-square is the most frustrating: a frame that looks fine until the projector reveals every diagonal as a skewed rectangle no amount of keystone can fully fix. The cure for all five is the same — plan the depth and the gap first, hang with slack, light indirectly, and check the frame with a level on every corner before the screen goes on. Each of these has its own deep-dive: bounce-back in the safety guide, frame squareness in the EMT frame guide, and lighting in the blackout guide.
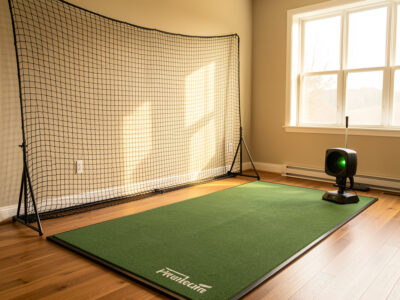
Should You Build a Full Enclosure or Start With a Net?
A full enclosure gives you a projected course and a contained ball; a net-only setup is cheaper and shallower but shows no image on the impact surface. If your room can hold the swing clearance plus a bounce-back gap and you want to play actual courses on screen, build the enclosure. If you are tight on depth or budget, a net with a side-mounted TV gets you practicing for a few hundred dollars less.
I started on a net before I ever framed an enclosure, and the honest progression is that the net teaches you whether you will actually use the space through a winter before you commit to the full build. The enclosure is the upgrade once you know the habit sticks. The net-only ball-containment and noise realities are a project of their own, but the room-planning that decides which is even possible for you comes first — the room depth guide tells you whether a full enclosure fits before you spend a krona.
What Order Should You Build the Enclosure In?
Build in this order: measure the room depth and set the bounce-back gap, frame to your ceiling, hang and tension the screen with deliberate slack, black out the sides, then align the projector last. Doing it backward — buying the screen first, then discovering the room is too shallow — is the most common and most expensive mistake in a DIY golf simulator enclosure.
The reason projector goes last is that you align it to a finished, tensioned, blacked-out surface; aligning to a half-built frame wastes an afternoon. My own first build went out of order and I re-hung the screen twice and re-keystoned the projector each time. Get the depth and the frame right and the rest follows in an evening. For the spatial planning that has to happen before any of this, the room requirements hub, the ceiling height guide, and the room width guide are the place to start.
If I were starting today with the room already measured, I would spend a Saturday morning cutting and squaring the frame, hang and tension the screen that afternoon with the slack deliberately left in, staple the blackout fabric the same evening, and leave projector alignment for the next day with fresh eyes. Rushing the projector at the end of a long build day is how you end up re-doing it. The single most important habit across the whole project is to resist buying anything until the room depth and the bounce-back gap are settled on paper — that one discipline prevents the most expensive mistakes a DIY golf simulator enclosure invites. Everything else is hardware you can adjust; room geometry is the one thing you cannot retrofit once the walls are where they are.
Frequently Asked Questions
How much does a DIY golf simulator enclosure cost to build?
A DIY enclosure runs about 190 to 650 dollars in materials: 40 to 150 for an EMT or 2×4 frame, 120 to 350 for a commercial impact screen, 30 to 90 for blackout fabric, plus the room depth for bounce-back. A commercial kit starts near 1,500 dollars.
Can I use a bedsheet or tarp instead of an impact screen?
No. A bedsheet or tarp tears under driver-speed strikes and ruins the projected image with wrinkles and seams. The impact screen is the one component you should not improvise. A mid-weight commercial woven panel is the minimum for a safe, sharp build.
How far should the screen be from the wall behind it?
Leave a deliberate air gap of several inches between the impact screen and any hard wall, and hang the screen with slight slack rather than drum-tight. This standoff absorbs ball energy instead of trampolining mishits back toward the hitter.
Do I need a projector or can I use a TV for a golf sim enclosure?
For a full enclosure you need a short-throw projector because the projection surface is the same panel that takes ball strikes, and a TV cannot survive that. A TV only works in a net-only setup where the display sits safely off to the side.
What is the best frame material for a DIY enclosure?
Most home builders use 3/4-inch EMT electrical conduit for a rigid, light frame at 80 to 150 dollars, or 2×4 lumber for the cheapest option at 40 to 70 dollars. EMT is easier to square and lighter to move; lumber is simpler if you already own saw and screws.
How do I clean a golf impact screen?
Wash with cool water and a soft brush only, never solvents or a washing machine. Clean when the white starts to grey, roughly monthly with daily use. Harsh cleaners break down the coating that keeps the weave projecting a sharp image.
Related Guides
- Impact Screen Material: How to Choose
- Building an Enclosure Frame from EMT Conduit
- Golf Sim Bounce-Back Safety
- Washing and Caring for an Impact Screen
- Projector vs TV for a Golf Sim
- Enclosure Blackout and Lighting Basics
Related Guides — Complete Spoke List
Full spoke list of the DIY Enclosure cluster:
- “Golf Sim Enclosure Blackout and Lighting Basics”
- “Projector vs TV for a Golf Simulator: Which to Choose”
- “How to Clean a Golf Impact Screen (and What Ruins One)”
- “Golf Sim Bounce-Back Safety: Screen Slack
- “EMT Conduit Golf Sim Enclosure Frame: A Build Walkthrough”
- “Golf Impact Screen Material: How to Choose for a Home Build”
More From This Site
Other guides across diy enclosure and the rest of the Virtualgolfmansion library:
- “Golf Sim Enclosure Blackout and Lighting Basics”
- “Projector vs TV for a Golf Simulator: Which to Choose”
- “How to Clean a Golf Impact Screen (and What Ruins One)”
- “Golf Sim Bounce-Back Safety: Screen Slack
- “EMT Conduit Golf Sim Enclosure Frame: A Build Walkthrough”
- “Golf Impact Screen Material: How to Choose for a Home Build”
- “Garmin R10 vs MLM2PRO: Radar or Camera on a Budget”
- “Which Budget Launch Monitor Data to Actually Trust”
- “Buying a Used Golf Launch Monitor: My Checklist”
- “The Best Launch Monitor Under $1
- “Radar vs Photometric: The Budget Launch Monitor Choice”
- “Garmin R10: The Honest Limits I Found”
- “Budget Golf Launch Monitors: What to Trust Under $1
- “Golf Simulator Room Depth: The Three Zones Explained”
- “Golf Simulator Screen Distance: Safe and Sharp”
- “The Garage Golf Simulator Reality Check”
- “Low-Ceiling Golf Simulator Options That Actually Work”
- “Room Width for a Golf Simulator: Centered and Safe”
- “Golf Simulator Ceiling Height: How Much You Really Need”
- “Golf Simulator Room Requirements: The Complete Tape-Measure Guide”