A mid-range golf sim build runs roughly $3,000 to $8,000 and is the sweet spot for serious home practice: it pairs a photometric launch monitor you can trust at SkyTrak+ class with a real impact-screen enclosure and a mat that protects your wrists. Spend it room-first, not monitor-first, and the same money buys far more usable practice.
I build sims for a living reason: I live in Sweden, where golf hibernates for five months and the indoor room is the only way to keep a swing alive. I have framed enclosures, fought projectors into keystone alignment, and run a Garmin Approach R10 and a SkyTrak+-class photometric against the same swings, same session, to learn where the numbers actually diverge. This is the guide I wish I had handed myself before I overspent on the wrong tier. It is the order I would buy in today, with the budget split that gives you the most honest practice data per krona.
What “Mid-Range” Actually Means (and Why It Is the Sweet Spot)
Mid-range is the $3,000–$8,000 band where a build stops being a toy and starts being a practice tool you can trust. Below it, you are buying a phone-tethered radar and a net; above it, you are paying for overhead camera systems and commercial screens that most home rooms cannot justify. The middle is where data trust, screen quality, and space all clear the bar at once.
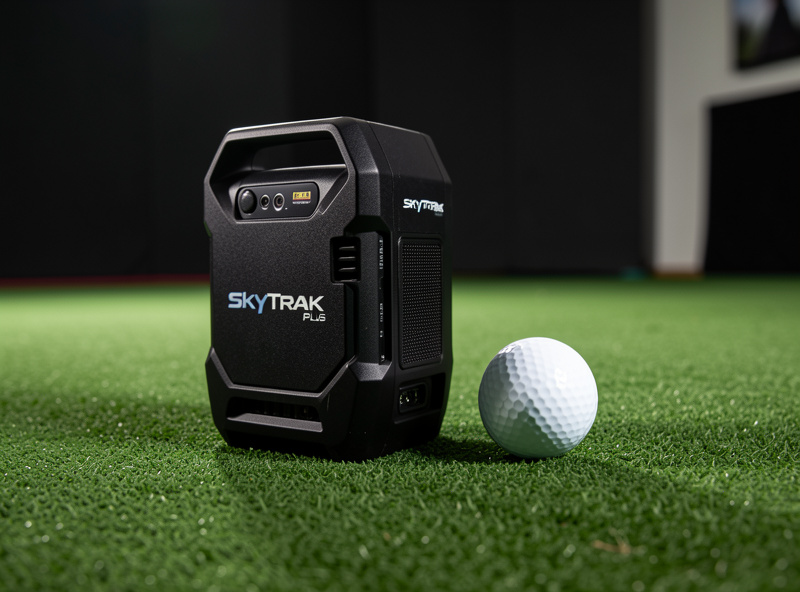
The honest dividing line is the launch monitor’s measurement type. A budget radar like the R10 infers ball flight; a photometric unit in the SkyTrak+ class photographs the ball at impact and measures it. That shift from inferred to measured is what your money buys in this band, and it is the single change that makes winter practice data worth acting on. Everything else in the build exists to give that monitor a fair, repeatable swing to measure.
The Room Is the First Component, Not the Monitor
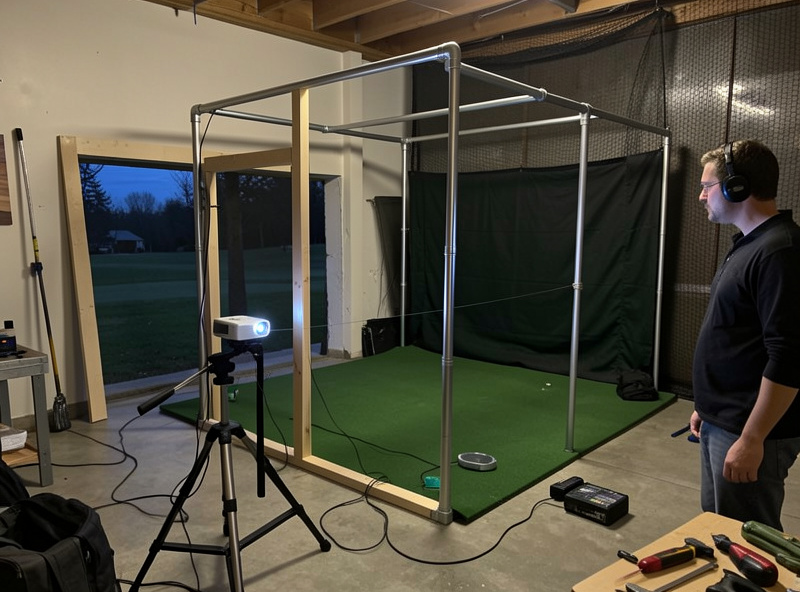
The ceiling kills more sim dreams than the budget does. Before you price a single launch monitor, measure your space: ceiling height for a full driver finish at your height, width for a centered stance with safe club arc, and depth for ball flight plus screen offset. I have watched people buy a $3,000 monitor for a room that physically cannot swing a driver, and the monitor was never the problem.
My standing rule is room-first buying order: the room budget — space, screen, mat — buys more practice value than the next monitor tier. Nobody selling launch monitors says this, because they sell monitors. But a trustworthy monitor in a cramped room where you swing tentatively gives you worse data than a cheaper monitor in a room where you can make your real swing. Start with my tape-measure room requirements guide, confirm your ceiling height, and plan your room depth zones before anything ships.
The Five-Component Budget Split
A mid-range build has five cost centers: launch monitor, enclosure and screen, projector, mat, and the PC plus software. The mistake I see most is dumping 70% into the monitor and netting the rest. The build that practices well spreads the money so the swing, the picture, and the data all hold up. Here is the split I would target across the band.
| Component | $3,000 build | $5,500 build | $8,000 build |
|---|---|---|---|
| Launch monitor | $700 (radar) | $3,000 (photometric) | $4,000 (photometric+) |
| Enclosure + impact screen | $700 | $1,000 | $1,600 |
| Projector | $600 | $700 | $900 |
| Hitting mat | $350 | $500 | $700 |
| PC + software (year 1) | $650 | $800 | $1,200 |
| Data you can trust | Directional | Yes | Yes, plus club data |
The $3,000 build is a great radar setup in a proper enclosure — it is where most people should start. The $5,500 build is the true sweet spot: a SkyTrak+-class photometric monitor changes what the room is for, because now the numbers are worth practicing against. The $8,000 build adds club-data depth and a better screen, and is where I would stop unless I were running leagues. I break the whole allocation down number by number in the golf sim budget breakdown.
Choosing the Launch Monitor: Radar vs Photometric
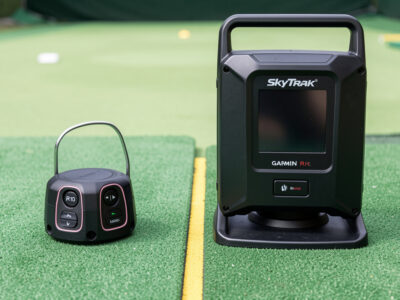
This is the decision the whole build orbits. A radar monitor like the Garmin Approach R10 tracks the ball and club with Doppler and infers spin and launch; a photometric monitor in the SkyTrak+ class uses high-speed cameras to measure the ball directly off the face. Same session, both monitors, the radar’s spin numbers wander on mishits and indoor short-flight shots while the photometric stays planted. That is the gap your upgrade money closes.
It does not mean the R10 is bad — it is the budget-radar reference I know to its edges, and it is genuinely good value. It means the two tools answer different questions. If you want a number you will rebuild your swing around, you want photometric. If you want a directional practice partner and a portable monitor for the range, radar is honest value. I lay the full trade-off out in radar vs photometric and in the honest limits of the R10, and the exact upgrade math lives in what the price jump from R10 to SkyTrak+ buys.
If you are coming from a sub-$1,000 monitor and deciding whether to leap, read upgrading from a starter launch monitor first — the answer is not always yes, and the room sometimes deserves the money more than the monitor does. For the budget tier itself, which budget data to actually trust and the best monitor under $1,000 will keep you from overpaying for numbers you cannot rely on. As an Amazon Associate I earn from qualifying purchases. When it is time to buy, the Garmin Approach R10 and the SkyTrak+ photometric monitor are the two anchor points of this band.
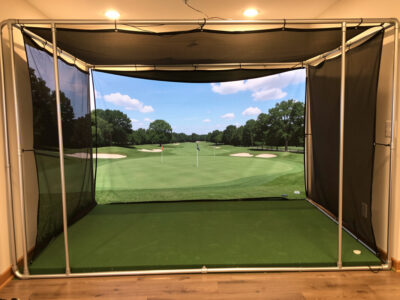
The Enclosure and Impact Screen
The enclosure is where the build becomes a room you want to be in. A mid-range enclosure means a commercial-grade impact screen on a rigid frame with proper slack and a safe bounce-back gap — not a net. I framed mine from EMT conduit and hung a commercial screen, and the two lessons that mattered most were screen slack for ball deceleration and the gap behind the screen so a fast ball never finds the wall.
Screen material is the spec people underbuy. A thin screen is louder, wears faster, and ghosts the projected image; a proper multi-layer impact screen takes the hit quietly and holds a sharp picture. I cover the choice in impact screen material, the frame in my EMT conduit frame walkthrough, and the safety geometry in bounce-back safety. For the mid-range-specific sizing and screen pairing, see the enclosure and screen guide for a mid-range sim. A good commercial impact screen is worth more to your picture than another projector tier.
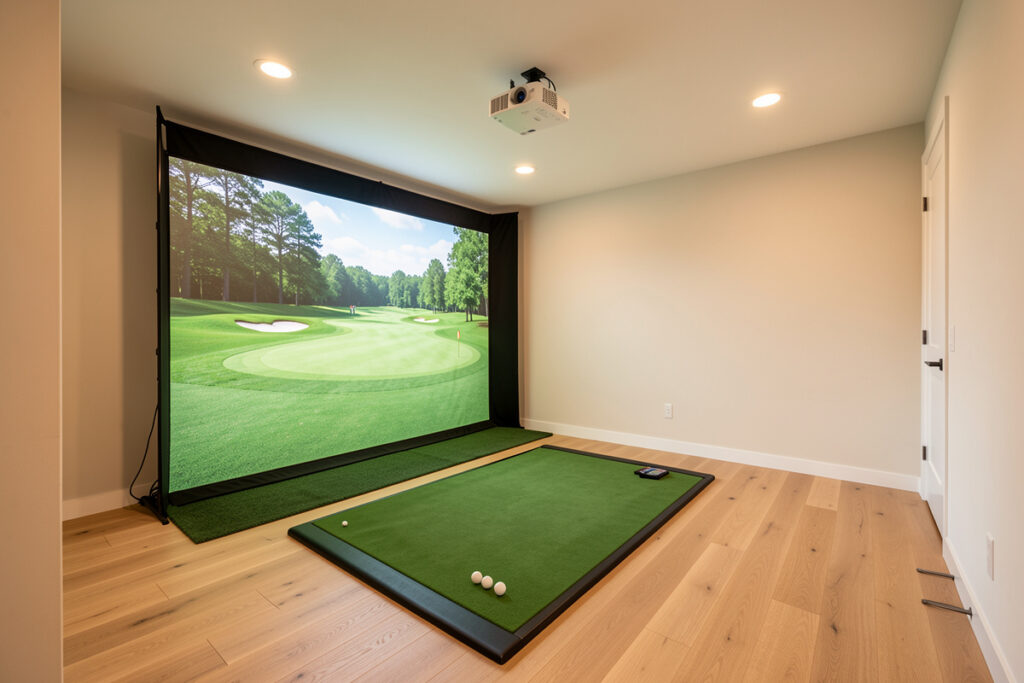
Projection: Short-Throw, Aligned Right
For a mid-range sim, a short-throw projector mounted on the ceiling and keystone-fought into the enclosure beats a TV for immersion and ball-flight read. The throw ratio is the spec that matters: short-throw lets you mount close enough that you never walk through the beam or cast a shadow on your own shot. I had already fought a projector into a sim-racing rig before I ever hung an impact screen — the golf sim just added ball flight to the same physics.
Resolution and brightness matter less than placement. A well-aligned 1080p short-throw at the right offset looks better than a misaligned 4K unit washing out a wrinkled screen. My full reasoning, including when a TV genuinely wins, is in projector vs TV for a golf simulator, and the room geometry that drives projector distance is in screen distance. A short-throw projector sized to your room is the right call here.
The Mat: Where Cheap Builds Punish You
The mat protects two things — your wrists and your data. A budget turf mat gives a fat shot a perfect lie it never earned, flattering your numbers and hiding the very mistake you came to fix; it also sends impact shock up the shafts and into your joints. A premium fairway-feel mat lets the club interact with the surface honestly and absorbs the strike. On my mat, the difference between a $100 and a $500 surface showed up as both better wrist comfort and more honest fat-shot feedback.
This is the component people cut to fund the monitor, and it is exactly backwards: a monitor measuring strikes off a dishonest mat is measuring a lie. Budget at least $350–$500 here in a mid-range build. A quality fairway-feel hitting mat earns its place before any monitor upgrade does.

The PC and Software
GSPro is my daily driver — the sim-racing instinct for strong community software carried straight over — with E6 Connect for its course physics and tournament ecosystem. The PC does not need to be exotic, but it does need a real GPU to hold frame rate at projector resolution. Mid-range here means a self-built or prebuilt machine with a current mid-tier GPU, which I sized from real frame-rate testing rather than spec-sheet guessing.
Budget for software as a recurring cost, not a one-time buy — course access and subscriptions add up over a winter. I cover the platform choice in the sim software guide and the exact machine in GSPro PC requirements. Build the PC last; it is the easiest component to right-size once the room and monitor are settled.
The Buying Order I Would Follow
Buy in this order and you will not waste money: measure the room, build the enclosure and screen, buy the mat, set the projector, choose the monitor to match your data ambitions, then size the PC. The order matters because each component constrains the next — your room sets your screen size, your screen sets your projector throw, and your data ambition sets your monitor tier. The monitor is the loudest decision but the most reversible; the room is the quietest and the most permanent.
If you only remember one thing: in this band, a trustworthy mid-tier monitor in a properly built room beats a top-tier monitor in a compromised one. The room is the practice; the monitor just keeps score.
Two Example Builds, Component by Component
Numbers on a table are abstract until you see them assembled. Here are the two builds I actually recommend most: the entry mid-range at roughly $3,000 and the sweet-spot build at roughly $5,500. Both assume you already have a room that passes the tape-measure test; if it does not, that money goes to the room first.
The $3,000 build is a radar monitor in a real enclosure. The Garmin R10 takes the launch-monitor slot, an EMT-conduit frame with a mid-tier commercial impact screen handles the picture, a $600 short-throw projector fills the screen, and a $350 mat keeps your wrists honest. The PC is a modest box that holds frame rate at 1080p. This build practices well for direction, gapping, and tempo; where it gets soft is spin on mishits and the indoor short-flight shots a radar struggles to see. It is the build I send most first-time sim owners to, because it teaches you what you actually want from the next tier.
The $5,500 build swaps the radar for a SkyTrak+-class photometric unit and that single change reorganizes the whole room. Now the spin axis and launch numbers hold on mishits, so practice stops being directional and starts being diagnostic — you can chase a specific number and trust that you moved it. I pair it with a larger commercial screen, a $700 short-throw projector with more lumens for a brighter picture, and a $500 fairway-feel mat that finally tells the truth about fat strikes. The PC steps up to a current mid-tier GPU so GSPro never stutters at the projector’s native resolution. This is the build I would keep for years.
The jump between them is about $2,500, and almost all of it lives in the launch monitor. That is the decision worth slowing down for, and it is exactly the one I break apart in the R10-to-SkyTrak+ upgrade guide — because the right answer depends entirely on whether you act on the data or just enjoy watching the ball fly.
The Mistakes That Waste Mid-Range Budgets
Most wasted money in this band comes from four predictable mistakes, and I have made two of them myself. The first is buying the monitor before measuring the room — a $3,000 unit cannot fix a ceiling that clips your driver finish. The second is underbuilding the screen and mat to fund the monitor, which leaves a trustworthy device measuring strikes off a dishonest surface against a screen that ghosts the picture.
The third mistake is overbuying the projector. Beyond a certain point, lumens and resolution stop mattering more than alignment and screen quality; a perfectly placed mid-tier short-throw beats an expensive misaligned one every time. The fourth is treating the PC as the exciting part and over-spending there while the screen stays cheap — the GPU only needs to hold frame rate at your projector’s resolution, not chase benchmark numbers. Get the order right, refuse to rob the room to feed the monitor, and a mid-range build will out-practice setups that cost twice as much. I keep coming back to the same rule because it keeps being true: build the room, trust the data, and let the monitor just keep score.
Frequently Asked Questions
How much should a mid-range golf sim build cost?
A mid-range golf sim build runs $3,000 to $8,000. The $5,500 mark is the true sweet spot, where a SkyTrak+-class photometric monitor, a real impact-screen enclosure, a quality mat, a short-throw projector, and a capable PC all clear the bar at once.
Should I spend the most on the launch monitor?
No. The common mistake is putting 70% of the budget into the monitor. Spread it across five components so the room, screen, and mat give the monitor a fair, repeatable swing to measure. A trustworthy monitor in a cramped room gives worse data than a cheaper one in a good room.
Is a SkyTrak+ worth it over a Garmin R10?
It depends on how you use the data. The R10 is a radar that infers ball flight and is excellent value; the SkyTrak+ is photometric and measures the ball directly, so its spin and launch numbers stay planted on mishits. If you want numbers to rebuild a swing around, the photometric upgrade is worth it.
What ceiling height does a mid-range sim need?
Enough for a full driver finish at your height, which for most adults means about 9 to 10 feet of usable ceiling. Measure before buying anything; the ceiling kills more sim builds than the budget does, and no monitor fixes a room you cannot swing a driver in.
Do I need a projector or will a TV work?
A short-throw projector gives better immersion and ball-flight read for most mid-range builds, but a TV genuinely wins in very shallow rooms or bright spaces where projection washes out. Throw ratio and placement matter more than resolution for a sharp, shadow-free image.
Which component should I buy first?
Measure the room first, then build the enclosure and screen, buy the mat, set the projector, choose the monitor, and size the PC last. Each component constrains the next: the room sets screen size, the screen sets projector throw, and your data ambition sets the monitor tier.