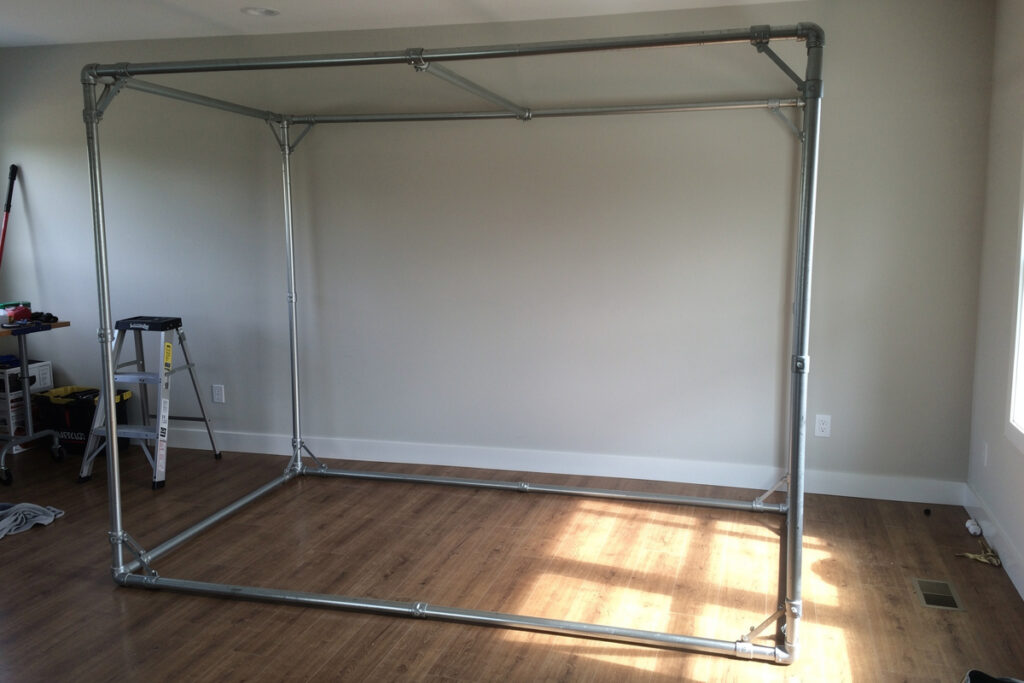
The cheapest rigid frame for a golf simulator enclosure is built from 3/4-inch EMT electrical conduit and slip-fit fittings, running about 80 to 150 dollars in parts. It is lighter than lumber, squares up cleanly, and can be sized to a ceiling no kit matches. The build takes a pipe cutter, a tape measure, a level, and an afternoon.
I framed mine from EMT after pricing commercial kits and finding none that fit my ceiling. The frame is genuinely the easy part of a DIY golf simulator enclosure — the catch is that a sloppy frame ruins everything downstream, because a racked frame shows up as a skewed projector image no keystone fully corrects. This is the conduit build the way I’d do it again, with the mistakes left in.
Why Use EMT Conduit for an Enclosure Frame?
EMT conduit is the go-to frame material because it is rigid, light, cheap, and joins with off-the-shelf fittings without welding. A 10-foot stick of 3/4-inch EMT costs only a few dollars at any hardware store, cuts with a hand pipe cutter, and assembles into a square that holds a tensioned screen. Compared to 2×4 lumber it is lighter to move and far easier to get truly square.
The competence point most guides skip: not all conduit sizes behave the same. Half-inch EMT flexes too much under screen tension and sags on long top runs; 1-inch is overkill and heavy. Three-quarter-inch is the sweet spot for a home-size enclosure — stiff enough to hold a flat screen, light enough to lift solo. I built my first attempt in half-inch and watched the top rail bow under the bungee tension; rebuilding in 3/4-inch fixed it completely. Buy the 3/4-inch and skip that lesson.
What Parts Does an EMT Conduit Frame Need?
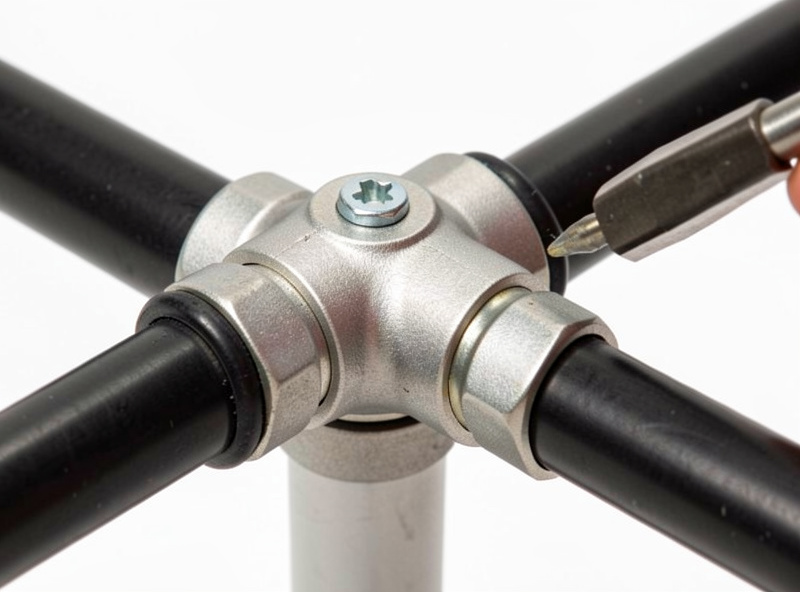
An EMT frame needs three things: the conduit itself (roughly 60 feet of 3/4-inch for a typical enclosure), slip-fit structural fittings for the corners and tees, and fasteners or set screws to lock the joints. Structural EMT fittings — the kind sold for building frames, not the electrical compression couplers — are what make the frame rigid instead of rubbery.
The fitting choice is where home builds go wrong. Electrical couplers are made to join pipe end-to-end for wiring, not to build a load-bearing rectangle; they pivot and the frame racks. Use purpose-made slip-fit framing fittings (three-way corners, tees, and crosses) that lock with set screws. I keep a driver and a spare pack of set screws on hand because the screws are what hold the geometry — a loose one and that corner drifts. Structural EMT slip-fit fittings and a handheld EMT pipe cutter are the two parts worth buying right the first time. As an Amazon Associate I earn from qualifying purchases.
How Do You Cut and Square an EMT Frame?
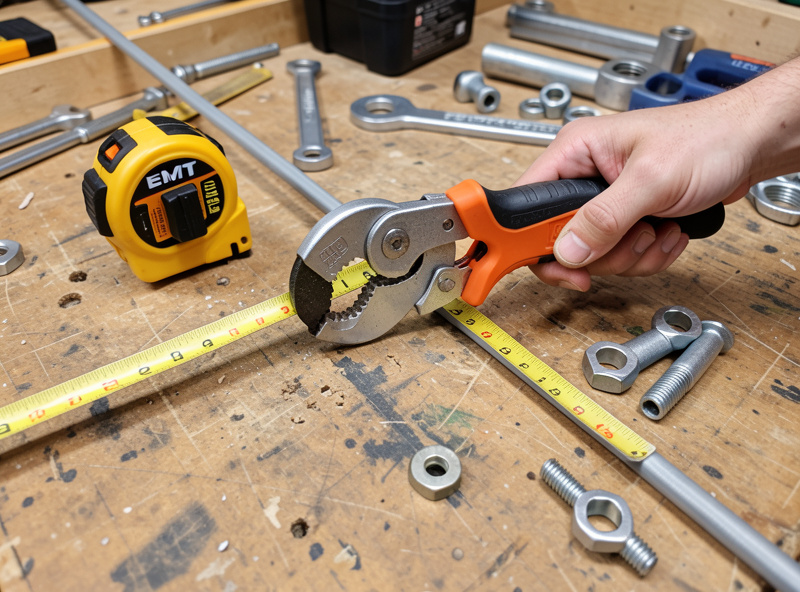
Cut EMT with a handheld pipe cutter, not a saw, because the cutter leaves a clean square end that seats fully into the fitting. Square the frame by measuring the two diagonals of each rectangle and adjusting until they match — equal diagonals mean square corners. A frame that measures square on the diagonals will hold a flat screen and a straight projected image.
A saw cut is the quiet killer of conduit frames. A ragged or angled end does not seat fully, so the fitting sits proud and the joint pivots; that is what makes a frame feel rubbery. The pipe cutter costs about fifteen dollars and pays for itself in the first frame. After assembly, before tightening every set screw, I measure both diagonals of the front rectangle and tap the frame until they are equal, then lock it down. Skipping the diagonal check is how you end up with a parallelogram that looks fine until the projector reveals it.
EMT Conduit vs 2×4 Lumber: Which Frame Is Better?
EMT is lighter, squares more easily, and looks cleaner; 2×4 lumber is cheaper at 40 to 70 dollars and simpler if you already own a saw and screws. For most home builders EMT wins on handling and precision, but lumber is a fine choice if budget is the only constraint and you are comfortable with woodworking. Both make a rigid enough frame when built carefully.
The honest trade-off: lumber is heavier and harder to move once assembled, and wood can warp in a humid room, slowly pulling a screen out of true. EMT does not warp and a one-person lift is realistic. Where lumber wins is attachment points — screwing netting and fabric into wood is trivial, while EMT needs clamps or zip ties. I went EMT for the weight and squareness and accept the slightly fiddlier fabric attachment. If you have a garage full of lumber tools and a permanent dry room, wood is defensible; for a movable, precise frame, conduit is the better engineering.
| Factor | EMT conduit | 2×4 lumber |
|---|---|---|
| Material cost | $80-150 | $40-70 |
| Weight | Light, one-person lift | Heavy |
| Squareness | Easy with diagonals | Harder, can warp |
| Fabric attachment | Clamps / zip ties | Screws directly |
| Tools needed | Pipe cutter, driver | Saw, drill |
How Do You Size the Frame to Your Room?
Size the frame to leave swing clearance above and beside the hitting position and a bounce-back gap behind the screen, then build to the largest screen that fits inside those limits. The frame width and height come from the room, not from a standard kit size — that is the entire reason to build your own. Measure ceiling height and depth first, then cut conduit to suit.
I see people build the biggest frame the room’s walls allow and only then discover the projected image crowds the swing or the screen sits too close to the back wall for safe bounce-back. The frame should fit inside the room’s usable envelope, not match its outer dimensions. Get the ceiling and depth numbers settled before cutting — the ceiling height guide and room depth guide give the minimums, and the frame is simply cut to land inside them. Conduit’s advantage is exactly this: you cut it to your numbers instead of accepting a kit’s.
How Do You Attach the Screen and Netting to EMT?
Attach an impact screen to an EMT frame with grommets and bungee cord looped around the conduit, and attach side netting with clamps or zip ties. The bungee gives the screen the deliberate slack it needs for safe bounce-back while keeping it flat. Conduit’s smooth round surface means you tension to the pipe rather than fastening into it.
This is the one place lumber is easier, but the conduit method is reliable once you set it up. I run a bungee cord from each screen grommet around the frame and back, which lets me adjust tension corner by corner as the screen settles over the first few weeks. For side netting I use cable clamps so it can be removed for cleaning. Keep the screen tension even and slightly loose — a frame this rigid will happily hold a screen drum-tight, and that is exactly the dangerous mistake the bounce-back rules warn against. Frame stiffness is for holding geometry, not for stretching the screen flat.
Can You Break an EMT Frame Down to Move It?
Yes — one of EMT’s quiet advantages is that a slip-fit frame comes apart at the fittings, so you can break it down to relocate the enclosure or store it in the off-season. Loosen the set screws, pull the pipe from the fittings, and the whole frame collapses into a bundle of conduit that fits in a car. A lumber frame, by contrast, is usually a permanent assembly.
I value this more than I expected to. The first build taught me my initial spot was wrong, and being able to dismantle the frame and rebuild it in a better corner without buying anything new saved the project. Mark each fitting and pipe with tape so reassembly is fast, and keep the set screws in a labeled bag. If there is any chance you will move the enclosure, or you share the room with another use, the demountable conduit frame is the practical choice. It also means a sizing mistake is recoverable — you re-cut one rail rather than scrapping a glued-and-screwed wooden box.
Frequently Asked Questions
What size EMT conduit should I use for a golf sim enclosure?
Use 3/4-inch EMT conduit. Half-inch flexes and sags under screen tension on long top runs, and 1-inch is heavy and overkill. Three-quarter-inch is stiff enough to hold a flat screen and light enough to lift and move solo.
How much does an EMT conduit enclosure frame cost?
An EMT conduit frame costs about 80 to 150 dollars in parts: roughly 60 feet of 3/4-inch conduit plus structural slip-fit fittings and set screws. That compares to 40 to 70 dollars for a 2×4 lumber frame or 400 dollars and up for a commercial frame.
What fittings do I need for an EMT enclosure frame?
Use purpose-made structural slip-fit framing fittings (three-way corners, tees, crosses) that lock with set screws, not electrical compression couplers. Electrical couplers are made to join pipe for wiring and pivot under load, which lets the frame rack out of square.
How do I make sure the EMT frame is square?
Measure the two diagonals of each rectangle and adjust until they match. Equal diagonals mean square corners. Cut conduit with a pipe cutter for clean square ends that seat fully, then check diagonals before tightening every set screw.
Is EMT conduit better than wood for an enclosure frame?
EMT is lighter, squares more easily, and will not warp; wood is cheaper and easier to attach fabric to with screws. For a movable, precise frame EMT wins; for the lowest cost with woodworking tools on hand, 2×4 lumber is a fine choice.
Keep Building
- DIY Golf Simulator Enclosure: Full Build Guide
- Golf Impact Screen Material: How to Choose
- Golf Simulator Ceiling Height
More from This Cluster
- “Golf Sim Enclosure Blackout and Lighting Basics”
- “Projector vs TV for a Golf Simulator: Which to Choose”
- “How to Clean a Golf Impact Screen (and What Ruins One)”
- “Golf Sim Bounce-Back Safety: Screen Slack
- “Golf Impact Screen Material: How to Choose for a Home Build”
- “DIY Golf Simulator Enclosure: Frame